
Table of Contents
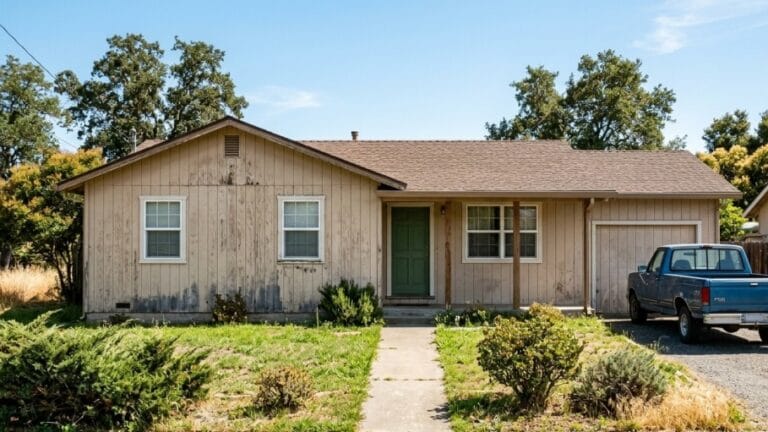
Owning a home is a journey full of surprises. Sometimes it’s the joy of a perfect backyard sunset, and other times, it’s the sinking realization that the wood wrapping your house is slowly softening at the bottom. If your home was built between the 1960s and the late 1980s, there is a very high probability you are living behind a very specific, grooved wood paneling.
Understanding what exactly is on your exterior walls, and knowing when to replace siding to protect your structural framing, is a crucial part of property maintenance. Today, we are taking a deep dive into T1-11 siding.
Whether you love its rustic, cabin-like charm or you are actively fighting a battle against wood rot, this master guide will cover everything you need to know. From detailed installation protocols to creative makeovers and modern alternatives, here is the honest truth about this iconic American building material.
What is T1-11 Siding?
Before we can fix it, paint it, or replace it, we need to answer the fundamental question: what is T1-11 siding?
In simple terms, it is a wood-based siding product that comes in large sheets, characterized by vertical grooves cut into the face to mimic the look of individual boards. Introduced in the 1960s, it revolutionized the construction industry because it was incredibly efficient. Instead of a carpenter nailing up individual lap boards one by one, a crew could slap up massive T1-11 siding panels that covered 32 square feet at a time.
Furthermore, a thick T11 board was strong enough to act as both the structural sheathing (the wood that holds the house frame square) and the exterior siding in one single layer. This “single-wall” construction saved builders massive amounts of time and money.
Plywood vs. OSB
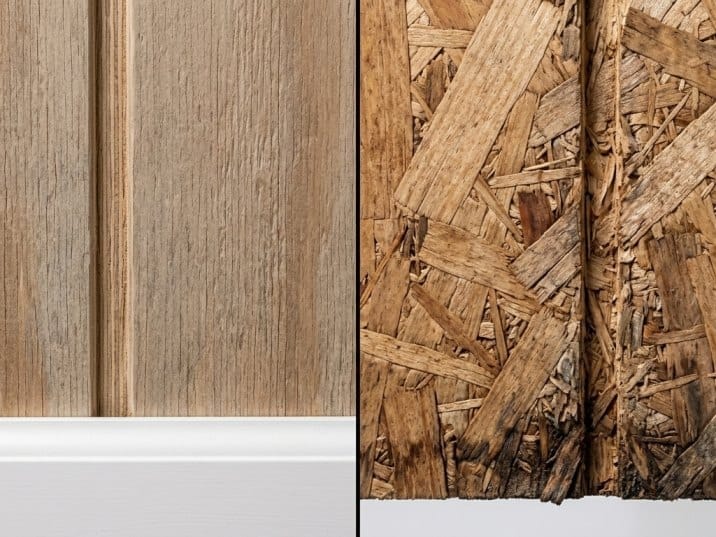
Not all panels are created equal. When you look closely at your home, you will find you have one of two variations:
- T1-11 Plywood: This is the original, higher-quality version. It is made by gluing thin sheets (veneers) of real wood together. It is stronger, lighter, and vastly more water-resistant.
- OSB (Oriented Strand Board): Introduced later as a cheaper alternative, this version is made of wood flakes and strands compressed with resin. While highly cost-effective, OSB is notoriously bad at handling moisture. If the paint seal breaks, it absorbs water like a sponge and flakes apart.
How Thick is T1-11 Siding?
If you are planning to replace a damaged panel or match an existing wall, you need to know your dimensions. How thick is T1-11 siding exactly?
The industry standard thickness is 5/8 inch (technically referred to as 19/32 inch in modern lumber yards). This thickness is critical because it gives the panel the structural shear strength required by building codes to brace the wall framing.
You can occasionally find thinner 3/8 inch versions. However, this thinner material cannot be used as structural sheathing on its own. It must be installed over an existing layer of plywood or OSB sheathing. If you are doing a patch job, always measure the thickness of your existing boards first to ensure a flush finish.
T1-11 Siding Problems
For all its affordability and efficiency, this material has a troubled reputation in wet climates like Northern California. T1-11 siding problems are legendary among contractors, and almost all of them trace back to one element: water.
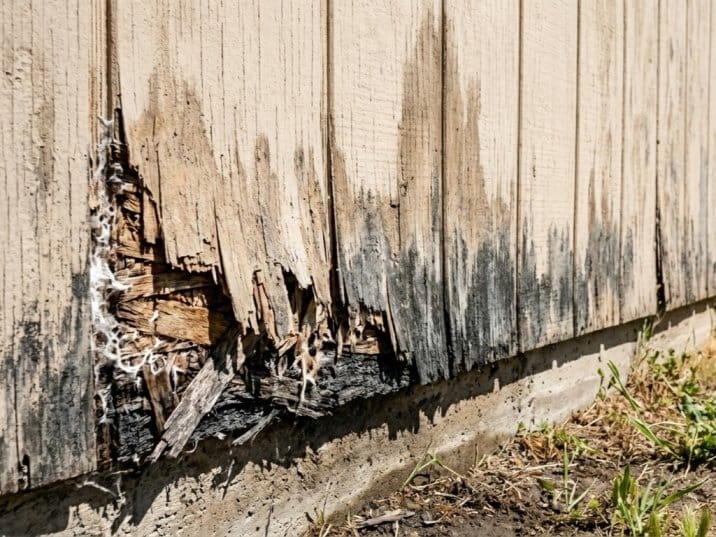
Much like the infamous hardboard siding that plagued homes in the 1990s, when T1-11 gets wet and stays wet, it fails catastrophically.
- The Bottom Edge Sponge: The bottom edge of the panel is exposed end-grain wood. If it sits too close to the soil, mulch, or a concrete patio, it wicks water straight up into the core of the board. This leads to delamination (the layers peeling apart) and severe dry rot.
- The Groove Vulnerability: The vertical grooves that give the siding its signature look are actually its weakest point. When the manufacturer cuts those grooves, they cut away half the thickness of the wood, leaving a very thin layer separating the outside elements from your interior wall cavity. If water sits in these grooves, it rots through incredibly fast.
Prevention: Making T1-11 Siding Waterproof
If your grooved siding is still in good shape, your absolute top priority is keeping it that way. Making T1-11 siding waterproof is not a one-time job; it is an ongoing commitment to maintenance.
Painting New T1-11 Siding (And Repainting Old)
You cannot cut corners here. Painting new T1-11 siding correctly is the only way to ensure it lasts decades instead of years.
- Prime the Grooves: You must use an oil-based or high-quality acrylic bonding primer. The primer must be worked deep into every single vertical groove.
- Seal the Bottom Edge: Before the panel even goes on the wall, the raw bottom edge should be heavily painted or primed. This seals the end-grain and stops the “wicking” effect.
- The “Back-Roll” Technique: When applying the topcoat, you cannot just spray it on with a paint sprayer. You must spray it and then immediately follow up with a thick paint roller (back-rolling) to manually push the paint into the rough texture of the wood fibers.
How to Install T1-11 Siding
Whether you are building a shed or re-siding a garage, knowing how to install T1-11 siding correctly is the difference between a 30-year wall and a 5-year disaster.
How to Hang T1-11 Siding Properly
- Clearance is Mandatory: The golden rule of how to hang T1-11 siding is maintaining a minimum of 6 to 8 inches of clearance between the bottom edge of the siding and the soil or landscaping. It should never touch the ground.
- Z-Flashing: Because panels are 8 or 9 feet tall, you often have to stack them to reach a roofline. Where the top panel meets the bottom panel, you must install metal “Z-flashing.” This metal piece kicks water out and away from the wall, preventing it from seeping into the seam.
How to Attach T1-11 Siding
When figuring out how to attach T1-11 siding, put the nail gun away if you don’t know the proper pressure settings. Over-driven nails break the wood veneer and create a hole for water to enter.
- Use hot-dipped galvanized or stainless steel siding nails (usually 8d or 10d).
- Nails should be driven every 6 inches along the edges of the panel, and every 12 inches along the studs in the middle (the “field”).
- Never nail inside the grooves; always nail on the high, flat surface of the board.
T1-11 Siding Ideas
Function aside, let’s talk aesthetics. The classic T1-11 siding house often looks like a rustic cabin or a 1970s suburban relic. But with a little creativity, it can be modernized.
When brainstorming T1-11 siding ideas, consider the architectural lines. This siding forces a vertical orientation. If you are debating vertical versus horizontal lines for your home exterior, T1-11 keeps the eyes moving up, which can make a single-story home look taller.
The Indoor Aesthetic: T1-11 Ceiling
Interestingly, this exterior cladding has found its way indoors. Designers looking for a highly textured, rustic, or industrial look frequently use these panels to create a striking T1-11 ceiling. Painted crisp white or stained a deep walnut, it adds incredible architectural interest to vaulted ceilings or covered patio roofs at a fraction of the cost of individual tongue-and-groove pine boards.
The Color Trend Caution
Right now, one of the most striking architectural trends is dark exteriors. However, if you are admiring houses with black siding, approach with caution when dealing with wood panels. Dark colors absorb massive amounts of solar heat. This extreme heat can cause the plywood veneers to warp, check (crack), and separate the glue bonds much faster than a light-colored paint would.
How to Make T1-11 Siding Look Better
If you hate the look of your grooved walls but don’t have the budget to rip them down, you are not out of luck. There are clever ways regarding how to make T1-11 siding look better without a full teardown.
The “Board and Batten” Hack: You can completely transform the look of the siding by installing wooden batten strips (usually 1×2 or 1×3 trim boards) directly over the grooves. By covering the grooves, you convert the dated paneling into a high-end, modern farmhouse “Board and Batten” exterior. Once painted a uniform color, nobody will ever know the original paneling is underneath.
T1-11 Alternatives
Eventually, every wood panel reaches the end of its life. When it is too rotted to save, you have an opportunity to upgrade. What are the best T1-11 alternatives on the market today?
1. Fiber Cement (The Permanent Fix)
Companies like James Hardie make vertical fiber cement panels that perfectly mimic the grooved look of wood but are made of Portland cement, sand, and cellulose fibers. They are fire-proof, termite-proof, and will never rot. It is the ultimate upgrade for longevity.
2. Plastic and Vinyl
If you love the vertical, textured look but refuse to ever hold a paintbrush again, modern manufacturers produce a brilliant T1-11 vinyl siding. It is molded to look exactly like painted wood grain but is made of durable PVC. You simply hose it off once a year, and it looks brand new.
3. Mixing Materials
If you are tired of the all-wood look, a full exterior remodel allows you to completely alter the home’s facade. Many homeowners evaluate stucco vs siding for a cleaner, modern look, or choose to replace siding with brick veneer along the lower three feet of the wall (the wainscoting) while using modern fiber-cement lap siding on the top.
Costs, Permits, and Hiring Pros
You have inspected your walls, found the rot, and decided it is time to move on from your old panels. Now comes the business side of the project.
T1-11 Siding Installation Cost
If you are strictly replacing old panels with new wood panels on a budget, T1-11 siding installation cost is generally lower than premium materials like fiber cement or cedar clapboard. Because the sheets cover 32 square feet at a time, labor goes quickly. In 2026, expect to pay between $4.00 and $8.00 per square foot for material and professional installation, though this varies widely depending on structural repairs needed underneath.
The Permitting Question
Because this specific type of paneling often acts as the structural sheathing holding your house together, removing it is a major structural event. If you are wondering if you need a permit for siding replacement when dealing with this material, the answer in almost every municipality is an absolute yes. The city building inspector must ensure the new material maintains the structural integrity and shear strength of your home.
Vetting the Right Contractor
This is not a job for a neighborhood handyman. Improper flashing or failing to leave the proper ground clearance will rot a new wall in less than five years. Knowing exactly what questions to ask a siding contractor, such as asking about their Z-flashing protocols, their preferred primer brands, and their experience with structural shear walls, will separate the true professionals from the corner-cutters.
The Bottom Line
There is no denying the historical importance and the rustic charm of the classic grooved panel. But it demands respect and rigorous maintenance. If you keep the bottom edges off the dirt, caulk the seams meticulously, and keep a thick coat of high-quality paint on the surface, your wood panels will serve you faithfully for decades.
However, if water has already won the battle, don’t waste your money painting over dry rot.
Is your siding showing its age? Don’t let a soft board turn into structural damage. Contact Sidex, your premier siding repair contractors in Northern California, for an honest, expert consultation today. Let’s protect your home’s exterior so you can enjoy the peace of mind inside.